Friday, March 15, 2019

The Great Microwave Oven Chicken Debacle and a Recipe for Vietnamese Black Pepper Chicken Wings

The invention of the microwave oven almost ruined my relationship with Poultry.  For real.  It was the early 1970s and my mother was the quintessential  "liberated woman" of that era.   She worked full time, had three young children, and there were never enough hours in the day...sound familiar?  We ate too many frozen chicken pot pies and fast food dinners and Mom Guilt was just as torturous then as it is today.  She wanted to provide nutritious home cooked meals and the idea that this Miracle Appliance could zap Raw Food and morph it into an Instant Meal held great appeal.  Mom was eager to make the dishes featured in the Microwave Cookbook and it wasn't long before Asian Chicken Drumsticks made an appearance.  I  still get queasy when I think about it.  
 

The chicken looked and tasted just as one would imagine….pallid, fatty skin made only faintly less so after its spin in the Microwave...somewhat gelatinous and smelling faintly of Orange. The meat was not much better...rubbery and tough, we had to tear into it like feral dogs in order to separate it from the bone.  Unfortunately, Asian Chicken Drumsticks became a family staple, appearing on the dinner table once or twice a week.  It got to the point where we  could stand it no longer and Mutiny ensued. The Era of Asian Chicken Drumsticks was officially over.  Praise the Lord and bring on the Boxed Macaroni and Cheese.


Years passed and I morphed into a busy mother myself and I could certainly relate to Mom's  desire to employ short cuts when it came to putting food on the table.   More years passed.  The kids grew up and feathered their own nests.  Meals are a two person event these days.  Cooking for two presents a different set of challenges.  Life is still crazy busy, and it sometimes seems like too much trouble to make a "real" dinner for just the two of us.   


We have "Boy Jobs" and "Girl Jobs" on the farm, political correctness be damned.  Frankly, I appreciate the fact that checking on a sheep in labor before bed time in the rain counts as a Boy Job.  The Farmer appreciates the fact that if we are to eat then I am in charge of making it happen. 


Advance Food Prep makes a big difference in my world and the Freezer is my best friend.  If I plan to make a Tikka Masala, I will make enough basic curry paste for that meal, and five more.  The extra is divided into small containers, labeled,  and frozen for future meals.  

Farm Days can be hectic and when we are in the midst of kidding
season or trying to get veggies planted in the fields, it is reassuring to know that I can grab a container of Indian Bhuna Masala from the freezer and have Tikka Masala on the table in minutes.  A "real" dinner just for the two of us after a long day is delightful way to reconnect!


One of my favorite sauces, Vietnamese Black Pepper Sauce, freezes beautifully so we always have it on hand.  It is very versatile...pairing well with both chicken and pork.  In fact, back when The Farmer and I owned a little Farm to Table Cafe in Leiper's Fork, Tennessee the Vietnamese Black Pepper Pork with Mango Pepper Salsa was a guarantee sell out when it appeared on the menu.  But I digress....today we are focused on delightfully sticky chicken wings!  These are always a hit...great for an appetizer or a meal.  They take a while to cook, but it is mostly inactive time, so you can throw on some laundry, do a bit of yoga, or help kids with homework and STILL get dinner on the table.  First, make a big batch of sauce!


Vietnamese Black Pepper Sauce


Yield: 3 cups


Vietnamese Black Pepper Sauce
I cut this recipe out of a magazine almost two decades ago but didn't try it until a few years ago. I shouldn't have waited so long!

ingredients:

  • 1 cup brown sugar (honey works well, too!)
  • 1/2 cup fish sauce
  • 1/2 cup water
  • 2 cloves fresh garlic
  • 2 teaspoons fresh ginger, peeled and roughly chopped
  • 2 Thai chilis, stems removed (substitute Jalapenos if you can't find Thai peppers)
  • 2 tablespoons neutral oil, such as Canola
  • Handful of Cilantro, stems included

instructions:

  1. Throw everything into your blender until well combined. Pour a cup of the sauce into a freezer safe container. Repeat. Label and freeze until you need them...you will be so glad you did!
Created using The Recipes Generator


Over the years my aversion to anything described as "Asian Chicken" abated and Vietnamese Black Pepper Chicken Wings are a welcome addition to the dinner rotation.


Yield: 2 dinner portions or appetizers for 8

Black Pepper Chicken Wings

The Black Pepper Sauce transforms chicken wings into a sticky, sweet and spicy treat!

ingredients:

  • 12 chicken wings
  • 1 cup of Vietnamese Black Pepper Sauce 
  • sesame seeds for garnish

instructions:

  1. Preheat the oven to 400 degrees.
  2. Slice off the wing tip (dogs love them and raw chicken bones are OK for dogs) and halve the wings at the joint.
  3. Arrange wings, skin down, in an aluminum foil covered roasting pan that is large enough to hold them in one layer.
  4. Pour a cup of Black Pepper Sauce over the chicken wings.
  5. Bake wings in the middle of the oven for 40 minutes,
  6. Turn wings over and bake until the Black Pepper Sauce is thick and sticky, about 40 more minutes.
  7. Sprinkle with sesame seeds
  8. Serves two as an entree or 8 as an appetizer.


These wings will appeal to young and old...the heat is very mild and can be adjusted to suit individual taste.

Truly...Finger Licking Good!


Saturday, January 26, 2019

The Quest for Pho, Winter Blues, and the perfect Lemongrass Pork Vermicelli Bowl

Winter torments me.  The grey.  The gloom.  The relentless mud.  Fortunately, the wood stove has been cranking and our sweet old farmhouse is warm and toasty.  My daily Tale of Woe and Lamentation must sorely try The Farmer's temper, but he simply reminds me that the Red Buds will be blooming before I know it.  He is right, of course, and I endeavor to enjoy what the season does bring to me...a brilliant flash of green moss growing on an rundown wood shed, new farm babies, our quiet babbling creek turned into a powerful force of nature, and winter sunsets that take my breath away.

Our 1894 homestead has neither central heat, nor air conditioning, so I  have learned the importance of working with the seasons rather than railing against them. It hasn't always been easy... our early summers on the farm were ridiculous...I spent my days bent over boiling canning pots, frantically trying to preserve all of the harvest.  It was 95 degrees outside and the temperature inside was over 120 degrees....Insanity.  The Farmer was miserable.  The Farm Hands were miserable. The dogs were miserable. I was beyond miserable.   Now, many of Summer's fresh fruits and veggies are frozen...tucked away until Winter.  The warmth generated by fast boiling canning pots and the heat of the oven are a welcome blessing when the outside temperatures are bitter cold!  Bonus: our Rosie Belle Farm CSA members get to enjoy a flavorful burst of Summer during those long winter months.

Farm Life is mostly perfect for us.  The stewardship of the land and the animals that inhabit it is our greatest joy.  This is not to say that we have not suffered and suffered plenty.  To wit:  There is no Pho in this part of the world.  No one has ever heard of it.  We live in a true Restaurant Desert...  the culinary highlights of the thirty minute trek into town are a Kentucky Fried Chicken and a McDonald's.   Winter with limited access to Pho has been very difficult, yet we have bravely soldiered on.

Until.......THE BEST DAY EVER!

The Farmer and I were in the old pick up truck searching for ChaffHaye...a specialty feed for our dairy animals.  The goats and cows can grow thin throughout the winter months.  The hay and grain that we provide is simply not as nourishing as the beautiful lush grass available for most of the year.  A farmer friend mentioned that their cows were doing well with ChaffHaye, a Non GMO fresh chopped bagged forage that captures the characteristics of pasture with added nutrients.  The product is not sold in our town so we set out to find some in a feed store several towns away.  While driving through the little town of Ardmore, Alabama, The Farmer and I gasped when we noticed a small sign in front of a gas station that stopped us short...It appeared to advertise PHO!


Could it be?  I dared not even hope....

He turned around and drove past it again.  The sign advertised Gas Station Vietnamese Take Out....Hmmmm.   We were giddy with the possibility.  Dare we try it?  The thought was at once thrilling and terrifying, but we knew we had to take a chance.  Success!!!   The gas station has become our favorite local restaurant and the proprietors have made Winter slightly less horrible.  The Lord does indeed work miracles.


LEMONGRASS PORK VERMICELLLI BOWL

Truly, Vietnamese Cuisine is one of my very favorites and Bun Bowls are satisfying year round.  Our CSA offerings in January included a beautiful Pork Loin Roast so I thought it timely to share my favorite recipe for Vermicelli (Bun) Bowls.  There are three main components to the meal:  Marinating the meat, pickling the veggies, and making the Nuoc Cham Sauce.  Once those tasks (which can be done several days ahead of time) are completed, the dish comes together in a flash.  Frankly, we keep Nuoc Cham and Pickled Carrots/Daikon in the fridge as staples, so this meal is truly "fast food."

1.  THE LEMONGRASS PORK
THE MARINADE:
*3/4 cup finely chopped lemongrass
*1/4 cup chopped garlic
*3 Tablespoons kosher salt
*1 1/2 Tablespoons coriander seeds,  
    toasted in a dry pan until fragrant
*1 1/2 Tablespoons black peppercorns
*1/2 cup of canola oil

Throw everything into a blender until it makes a uniform paste.


THE MEAT
I used a beautiful three pound boneless Rosie Belle Farm Pork Loin Roast.  The recipe can be used to make a delicious banh mi sandwich if you choose.  I opted for the noodle bowl this time around!

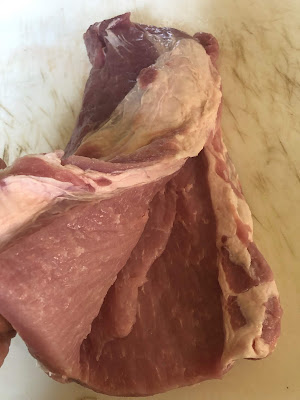
Put the Roast on a cutting board and, starting at the top, begin to cut into the pork horizontally at the "halfway" point.  Your intention is to ultimately slice the Loin ALMOST in half so that it can be opened like a book, with the left and right sides being equal.  Think of opening a 100 page book to page 50, so that both sides are the same thickness.

Take half of the marinade and rub it generously on the "open" surface and then roll the pork into a tight cylinder.  Rub the remaining marinade on the outside of the meat and secure the roll with butchers twine.  (Kitchen Hack: I was out of twine and found that plain cotton embroidery floss served in a pinch).

Put the Roast in a plastic bag and put it in the refrigerator for at least 8 hours.  I let my roast marinate for two days.


THE PICKLED CARROTS AND DAIKON

This will make more than you need for one meal, but we keep these pickles on hand to dress up salads and sandwiches.

*1 cup white vinegar
*1 cup white sugar
*1 teaspoon kosher salt
*2-3 cups of carrots, daikon radish, or a combination of the two, julienned.

I use this peeler, which does all the hard work.  It is less than $8 and you will never believe that you have lived without it for all of these years.

Combine the vinegar, sugar and salt.  Stir until the sugar and salt dissolve.  Add the veggies and let them sit for at least thirty minutes so the flavors blend.  The pickled veggies will last several weeks in the refrigerator.   Drain before serving.

THE NUOC CHAM SAUCE
This Vietnamese "salad dressing" is the veritable Key to the Kingdom.  I cannot say enough about this sauce.  Great on salads, wonderful over rice, it is as delicious as it is beautiful.

*1 cup fish sauce
*2/3 cup white sugar
*1/2 cup lemon juice
*1 cup water
*4 cloves of chopped garlic
*2 Thai bird's eye chilis, chopped
*1 jalapeno, chopped

Combine the first four ingredients and stir until sugar and salt dissolve.  Add the garlic and the peppers.  Let the sauce sit for thirty minutes so that the flavors blend.  I find that this sauce keeps well for several weeks in the fridge.


PULLING IT ALL TOGETHER

Bring the marinated pork to room temperature, preheat the  oven to 325 degrees and gather your ingredients:

Meat Thermometer
Marinated Pork Loin
Dried Rice Vermicelli, 1 pound
Shredded Lettuce
Chopped Peanuts
Fresh Cilantro
Fresh Mint
Pickled Carrots/Daikon
Nuoc Cham Sauce

ROAST THE MEAT
Meat roasted with the aid of a meat thermometer is generally better tasting, at least in my house.  Every oven is different and my ovens tend to run hot.  There is temperature variance between the top and bottom racks and even from the front of the oven to the back of the oven.  A good thermometer takes out the guess work.  You can find the one I use on Amazon.  Roast the pork at 325 degrees on a rack placed in the middle of the oven.  Set your timer for 40 minutes and then pop in the thermometer.  Pork is generally cooked to 140 degrees but in my experience, that is too much and your roast will be dry.  I remove it from the oven at 130 degrees as it will continue to cook for several minutes as it rests on the countertop.  When it is cool enough to handle, slice off enough meat for your meal and chop it into bite sized pieces.  Since we are only feeding two, there are plenty of leftovers.   It freezes well and will come back to our table in the form of Banh Mi as well as Spring Rolls!

PREPARE THE VERMICELLI
Prepare the vermicelli while the pork is resting.  I use an instant kettle to boil water in about a minute.  Put the vermicelli in a bowl and pour the boiling water over the noodles.  They are ready in less than five minutes.  Drain the water.

DECISIONS, DECISIONS
During the summer months I serve this meal at room temperature, so I would allow the meat and the noodles to cool completely before serving.  During the winter months I prefer to use hot meat and hot noodles.  It is not traditional, but I like the sensory juxtaposition.

ASSEMBLING THE BOWL
Put the rice in a bowl and then add the rest!  Chopped lettuce, pickled veggies, chopped pork, peanuts, herbs and then drizzle with the dressing.  Dinner is served!

Food from our Farm to your Table!


Thursday, December 13, 2018

Candied Ginger, Ginger Syrup, and The Perfect Ginger Cookie

I have the perfect Ginger Cookie Recipe.  It is everything that a ginger cookie should be...chewy in the center, slightly crisp on the edges, and so gingery that it makes your tongue tingle.  It tastes like the warm cozy December of your Dreams, not the Insanely Expensive Overly Scheduled Decembers of your Reality.  It uses ginger root in four forms:  ground, chopped, candied, and syrup.  The challenge with this recipe is that, to do it justice, it takes a really long time.  For real.  Peeling ginger is tedious work.

Have I scared you?  I hope not!  You can certainly buy all of the Ginger Ingredients "ready made" --- I always purchase the ground ginger---and the cookies will be super delicious.  It's just that you will not get to enjoy the side benefits of extra candied ginger (great for digestion) and some seriously delicious Ginger Syrup (add Club Soda to make a killer Ginger Ale).  Gift yourself with a day in the kitchen and process 2 pounds of ginger root into candy, syrup, spicy sugar, and finally....a cookie that hugs you!

Prepping the ginger root is not complicated:

First, peel two pounds of ginger root.  It is an irregularly shaped root with lots of knobs and twists, so a spoon is the easiest -- and safest -- way to peel the skin.  This is the mind numbing part of the process and I find that a good podcast or a nice glass of wine helps.


The hard part is over!   Let's make some Ginger Syrup!

You will need:

8 cups of sugar
6 cups of water
2 pounds of ginger sliced into very thin rounds

NOTE:  Save a couple of knobs of ginger to grind up if you are going to make the Ginger Cookies featured in the recipe below.

Heat the sugar and water at medium high temperature using a wide, low pot that is large enough to accommodate the ginger.  Stir continuously to avoid burning the sugar.  Bring to a boil and carefully add the ginger.  Return to a low boil, stirring occasionally, for about 45 minutes.  Cover and give the ginger time to cool.

Once the ginger has cooled enough to be workable you can strain out the liquid, which is your Ginger Syrup.  Use a colander over a big bowl and let the ginger strain for at least 30 minutes, stirring the ginger around gently once or twice.  NOTE: If time permits, I let the ginger and syrup sit overnight to maximize the infusion of ginger into the syrup.
This recipe yields about 1 1/2 quarts of Ginger Syrup.
Now for the Candied Ginger!

Preheat oven to 200 degrees

You will need:
2 cups of sugar, more or less
Baking sheets lined with parchment paper and baking rack

Put a cup of sugar into a bowl and add a few handfuls of the strained ginger.  Mix it until it is well coated and then put the slices on the baking rack.  A lot of the sugar and the tiniest pieces of ginger will fall through the baking rack so parchment paper helps with clean up.  The recipe will fill up four baking sheets.

Place the ginger in  a 200 degree oven for about 30 to 40 minutes to insure that the candy is no longer sticky.  The sugar balances the fire of the ginger.  Added bonus: The ginger sugar that has collected on the baking sheet can be saved and used to roll your ginger cookies!
I was able to fill a gallon jar with candied ginger with this recipe.

Add a few tablespoons of ginger syrup to club soda for instant, and delicious, ginger ale!

Now that you have done all of this work, the Ginger Cookies are an absolute breeze!

Yield: 3 dozen large cookies

Rosie Belle Farm's Quadruple Ginger Cookies

These amazing cookies utilize ginger root four ways: ground, chopped, candied, and in a fiery syrup.

ingredients

5 cups all purpose flour
1 cup candied ginger, finely chopped
4 teaspoons baking soda
1/2 teaspoon salt
1 1/2 cups of butter, room temperature
2 cups brown sugar
2 eggs
1/4 cup sorghum molasses
1/4 ginger syrup
1 tablespoon fresh ginger, peeled and finely grated
1 tablespoon ground ginger
2 teaspoons ground cinnamon
1 teaspoon ground cloves
1 cup of sugar, more or less, for rolling the cookie

instructions

Preheat oven to 350 degrees and line two cookie sheets with parchment paper.

Combine flour, candied ginger, baking soda and salt in a bowl.  Add butter to electric mixer and beat for 2 minutes or so, until butter is creamy.  Add brown sugar and beat for another 3 minutes.  Add eggs, molasses, ginger syrup, fresh ginger, ground ginger, cinnamon, and cloves.  Beat until well blended.  Add flour mixture slowly at low speed until just blended.

Put sugar in a small bowl.

Make a golf ball sized ball of dough and roll it in the sugar to coat it, then place on the cookie sheet.  Leave several inches between cookies as the dough will spread as it bakes.  Don’t crowd…make about 8-10 cookies per sheet.

Bake cookies until the surface cracks, about 15 minutes.  The center should be soft and chewy while the edges are a bit crisp.

Yield approximately 3 dozen cookies depending upon the size.

Cookies are love.  Enjoy!

Wednesday, June 1, 2016

Farm Dogs, Farm Babies, and The Pefect Summer Cole Slaw

Grand Dame Daisy is an incredible Mother to every baby on the Farm!
We are small time organic Farmers.  We have two tractors but not much else in the way of heavy equipment.  The Farmer tends to his vegetables one row at a time, eschewing chemical spray for old fashioned Weed Pulling.   I hand milk  Elsie the cow as well as the 10 goats currently in milk, preferring the intimacy that comes from sitting and talking and getting to know my girls.  I have a milking machine and it would save me a few minutes in a Too Busy Day but I would lose much!  The time spent milking gives me the opportunity to observe each of them....do Stella's hooves need to be trimmed? Has Dolly lost weight?  Is aging Daisy getting arthritic?   Farming is a very busy business.  Neither the Farmer nor I are afforded much in the way of leisure time, but we are gifted with a window into a funny world that many do not see.

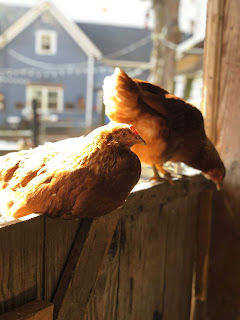
There are meaningful and deliberate interactions between the species on Rosie Belle Farm.  1200 pound Elsie lumbers into the Dairy Barn for morning milking while five or more hungry chickens dance beneath her clumsy feet and pendulous udders.  They are all racing for the same destination....the Feed Trough.  Elsie is a Pastured Cow and only gets a bit of grain at milking time.  She is as gentle as she can be, making sure not to hurt any of the silly hens scattering under foot.  She eats quite contentedly alongside them, giving a gentle nudge with her massive head if one needs a bit of redirection.  Elsie seems to be aware of her powerful strength, for which I am grateful!


There is enough for everyone to eat!
 We had some new babies born on the Farm this week.  The little ones were born to Alien 2, a goat that has a reputation for being bossy and bad tempered.  She was a rather indifferent mother the first time around so I didn't have high hopes with her second freshening.  Happily, she could not be more devoted.  


So much so, in fact, that she has been terrorizing poor Georgie, my youngest dog. Georgie came to us about a year ago...we spotted him racing down a rural highway, dragging a heavy chain attached to a too tight collar cinched around his neck.  The end of the chain was attached to a plastic milk container, filled with rocks and sand.  His tag was illegible and there was no microchip.  One of our old farmer friends said that he was "dressed for a drowning."  We took him home with us and he proceeded to pee on every wall in the house, apparently deciding that he was going to be the Alpha.  And so it is.....He is wickedly annoying to everyone but the Farmer and me, who find his antics adorable. Anywhoo...Georgie is the Farm Baby Ambassador.  

The little goat pictured at left was unable to walk when she was first born.  Georgie did not leave her side.  He was the nurturing Mom in her world.  She is now a healthy and happy member of the team.
There is not a baby that he does not mother and most of the Farm Moms accept his ministrations to their brood.  Not so Alien 2.  She goes ballistic every time he gets close to her little ones, which seems to make him ever more determined to get to them.  She will occasionally leave them for a bit of grazing time and Georgie makes his move.  He settles in with them for a snuggle and soon the fight begins.  Mom returns to the barnyard and he won't let her near her babies.  She head butts him, he snaps at her.  The foolishness continues until I call him into the house.  Same routine every day....they both seem to enjoy it.

The heat has finally come to Middle Tennessee and I am thrilled.  I am inspired to work in the yard and am currently building rock walls for the garden in the front yard.  Our first year on the Farm was spent dealing with critical infrastructure issues so it is lovely to concentrate on beautification projects!  Late afternoons in the garden mean that I want something fast and cool on the table....we have been enjoying cabbage salad quite a bit lately.  It is a No Mayo Coleslaw that I have dubbed The Best Coleslaw in the World.  Pretty big statement, I know, but I really believe it to be true.  It is a beautiful dish, with peppers that sparkle like little jewels and a dressing that is fresh, clean, and bright.


The Best Cole Slaw in The World

Ingredients

3/4 cup olive oil
1/2 cup rice wine vinegar
1/2 cup sugar
2 cloves chopped garlic
1 teaspoon Dijon mustar
2 teaspoons chopped shallots
1 teaspoon of lemon juice
1 head of green cabbage, julienned
1/4 head of red cabbage, julienned
1 red pepper, 1/4 inch dice
1 green pepper, 1/4 inch dice
1 yellow pepper, 1/4 inch dice
1 carrot, shredded
1 red onion, thinly sliced
1-2 Tablespoons chopped fresh dill
Salt and Pepper to Taste

Directions


Whisk the first seven ingredients together to make the vinaigrette.  Toss all of the shredded vegetables in a bowl and add the vinaigrette.  Toss and Chill for a bit to allow the flavors to meld.   Enjoy!